Setup the Environment
This section provides an overview of setting up a C++ development envrionment.
Setting up MacOS for C++ development is much easier than others would like you to believe.
Install Visual Studio Code
If you head to the download link and click either the Apple silicon or Intel chip version (depending on how new your Mac is).
Once downloaded, open the .zip file and then drag the Visual Studio Code.app file into your Applications folder.
This is going to be your code editor, the difference between Visual Studio Code and Visual Studio is that Visual Studio Code is a code editor, whereas Visual Studio is an IDE (Integrated Development Environment).
We can use Visual Studio Code along with the C++ compiler to do all of the things that we need to do.
Install Brew
Brew is a package manager. Much like apt on Debian-based Linux distributions, brew allows us to install packages from the command line.
If you haven't used Linux or done CSCN 345, don't worry, it's not that hard.
Open up a terminal window by pressing cmd + space and then typing terminal and pressing enter.
Then head to brew.sh and copy the command under the Install Homebrew heading.
Paste this into your terminal and press enter.
This will install homebrew, and you will be able to use it to install packages.
Now you should have everything you need installed, we just need to set it up.
Making a Workspace
The first thing you may want to do is create a folder for all of your labs/projects. We personally each have a folder for each class like ~/Documents/Liberty/CSCN-111 and ~/Documents/Liberty/CSCN-112.
You can create those using the following command in your terminal:
mkdir -p ~/Documents/Liberty/CSCN-111
This command will create the folder and all parent folders (hence the -p addition to the command). You can replace CSCN-111 with whatever class you are taking.
You can now open Visual Studio Code and open that folder by clicking File > Open and then selecting the folder you just created.
Using VSCode for C++
Now that you have VSCode open, you can start writing C++ code. We recommend creating another folder inside of the one you are using for the class, and calling it testing or something similar. Then, just add a main.cpp file where you will write your code.
Your explorer should look something like this:

You can open the file and everything, but before you can compile and run it easily, you will need to install a few extensions.

The extensions you will need are:
- C/C++ Extension package
- Better C++ Syntax
- Code Runner
You can install these by clicking the extensions icon on the left side of the window, and then searching for them in the search bar.
Once installed, you may have to reload the window (it will prompt you to do so).
Before you can compile, you need to go to your JSON settings file. You can do this by pressing cmd + shift + p and then typing settings json and pressing enter.
From there, press cmd + f to search and type in code-runner.executorMap and press enter. Once you are there you need to either add or replace the "cpp" line with the following:
"cpp": "cd $dir && g++ $fileName -std=c++14 -o $fileNameWithoutExt && $dir$fileNameWithoutExt",
Make sure that this is the only line that has
cppin it, otherwise you may break something.
You should be able to head back to your main.cpp file and then paste in this code so we can test it out:
#include <iostream>

using namespace std;

int main() {
    cout << "Hello World!" << endl;
    cout << "2 + 2 is most certainly " << 2 + 2 << endl;
    return 0;
}
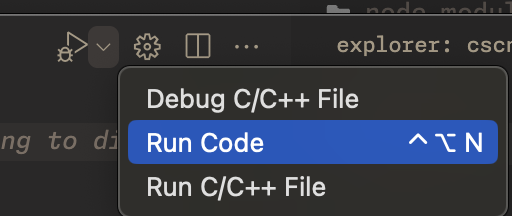
By clicking the dropdown menu next to the play button at the top right of the window, you should be able to select Run Code and it will compile and run your code.

You should see the output of your program in the terminal window at the bottom of the screen.
That's all you need to run and compile C++ code simply and easily on your Mac.